What is image annotation?
Image annotation is the practice of marking up images so a computer-vision model can learn from them — drawing a box around each object, outlining it pixel by pixel, placing points on a skeleton, or tagging the whole image with a class. The marks and the images together are the training dataset. Which kind of mark you make is decided by the task the model has to perform, and the finished set is exported in a standard format such as COCO, YOLO, Pascal VOC or Datumaro for whatever trains on it.
Annotation, labelling, and the difference
The two words are used interchangeably most of the time, and arguing about them is rarely worth it. Where a distinction is drawn, "labelling" means attaching a class to something and "annotation" means everything else as well — the geometry, the identity of an object across frames, the attributes hanging off a shape. Tagging a photo as "night" is labelling under either reading; outlining every car in it is annotation under both.
What matters more than the word is that annotation is a data-authoring job, not a data-entry one. A dataset is a set of decisions — what counts as an object, where its edges are, what to do with the ones you can barely see — and the model learns the decisions, including the inconsistent ones.
The main annotation types
Each type produces a different kind of mark, and each trains a different kind of model. They are not interchangeable: a dataset of boxes cannot train a segmenter, and a dataset of masks is expensive over-specification if boxes were all you needed.
| Annotation type | What you produce | What it can train |
|---|---|---|
| Image classification | One or more labels for the whole image — no geometry at all | A model that says what an image is: "defective", or "outdoor, night, rainy", or a node in a class tree |
| Object detection | A bounding box around each object, with a class | A model that says where objects are and how many — the cheapest useful geometry |
| Instance segmentation | A polygon or a pixel mask per object, with a class | A model that outlines each object separately, so two overlapping cars stay two objects |
| Semantic segmentation | A class for every pixel, with no separation between instances | A model that answers "which pixels are road", not "how many roads" |
| Keypoints and pose | Named points on a skeleton template, each with a visibility flag | A model that locates joints or landmarks — human pose, facial points, part positions |
| Polylines | An open line rather than a closed region | A model for things with length but no meaningful area — lanes, wires, cracks, seams |
| Video tracks | One shape per object carried across frames, keeping a stable identity | A model that follows the same object over time rather than re-detecting it each frame |
AnnotateIt offers exactly six creation types: Object Detection, Instance Segmentation, Keypoint Detection, Classification — Single Label, Classification — Multi Label and Classification — Hierarchical. All six accept images, native video and Camera media — photos or silent recorded clips. Object Detection keeps box identity with video tracks; Instance Segmentation uses object-mask tracks; Keypoint Detection is frame-by-frame; and the three Classification types label frame ranges. Polylines remain a tool inside Instance Segmentation rather than a separate project type.
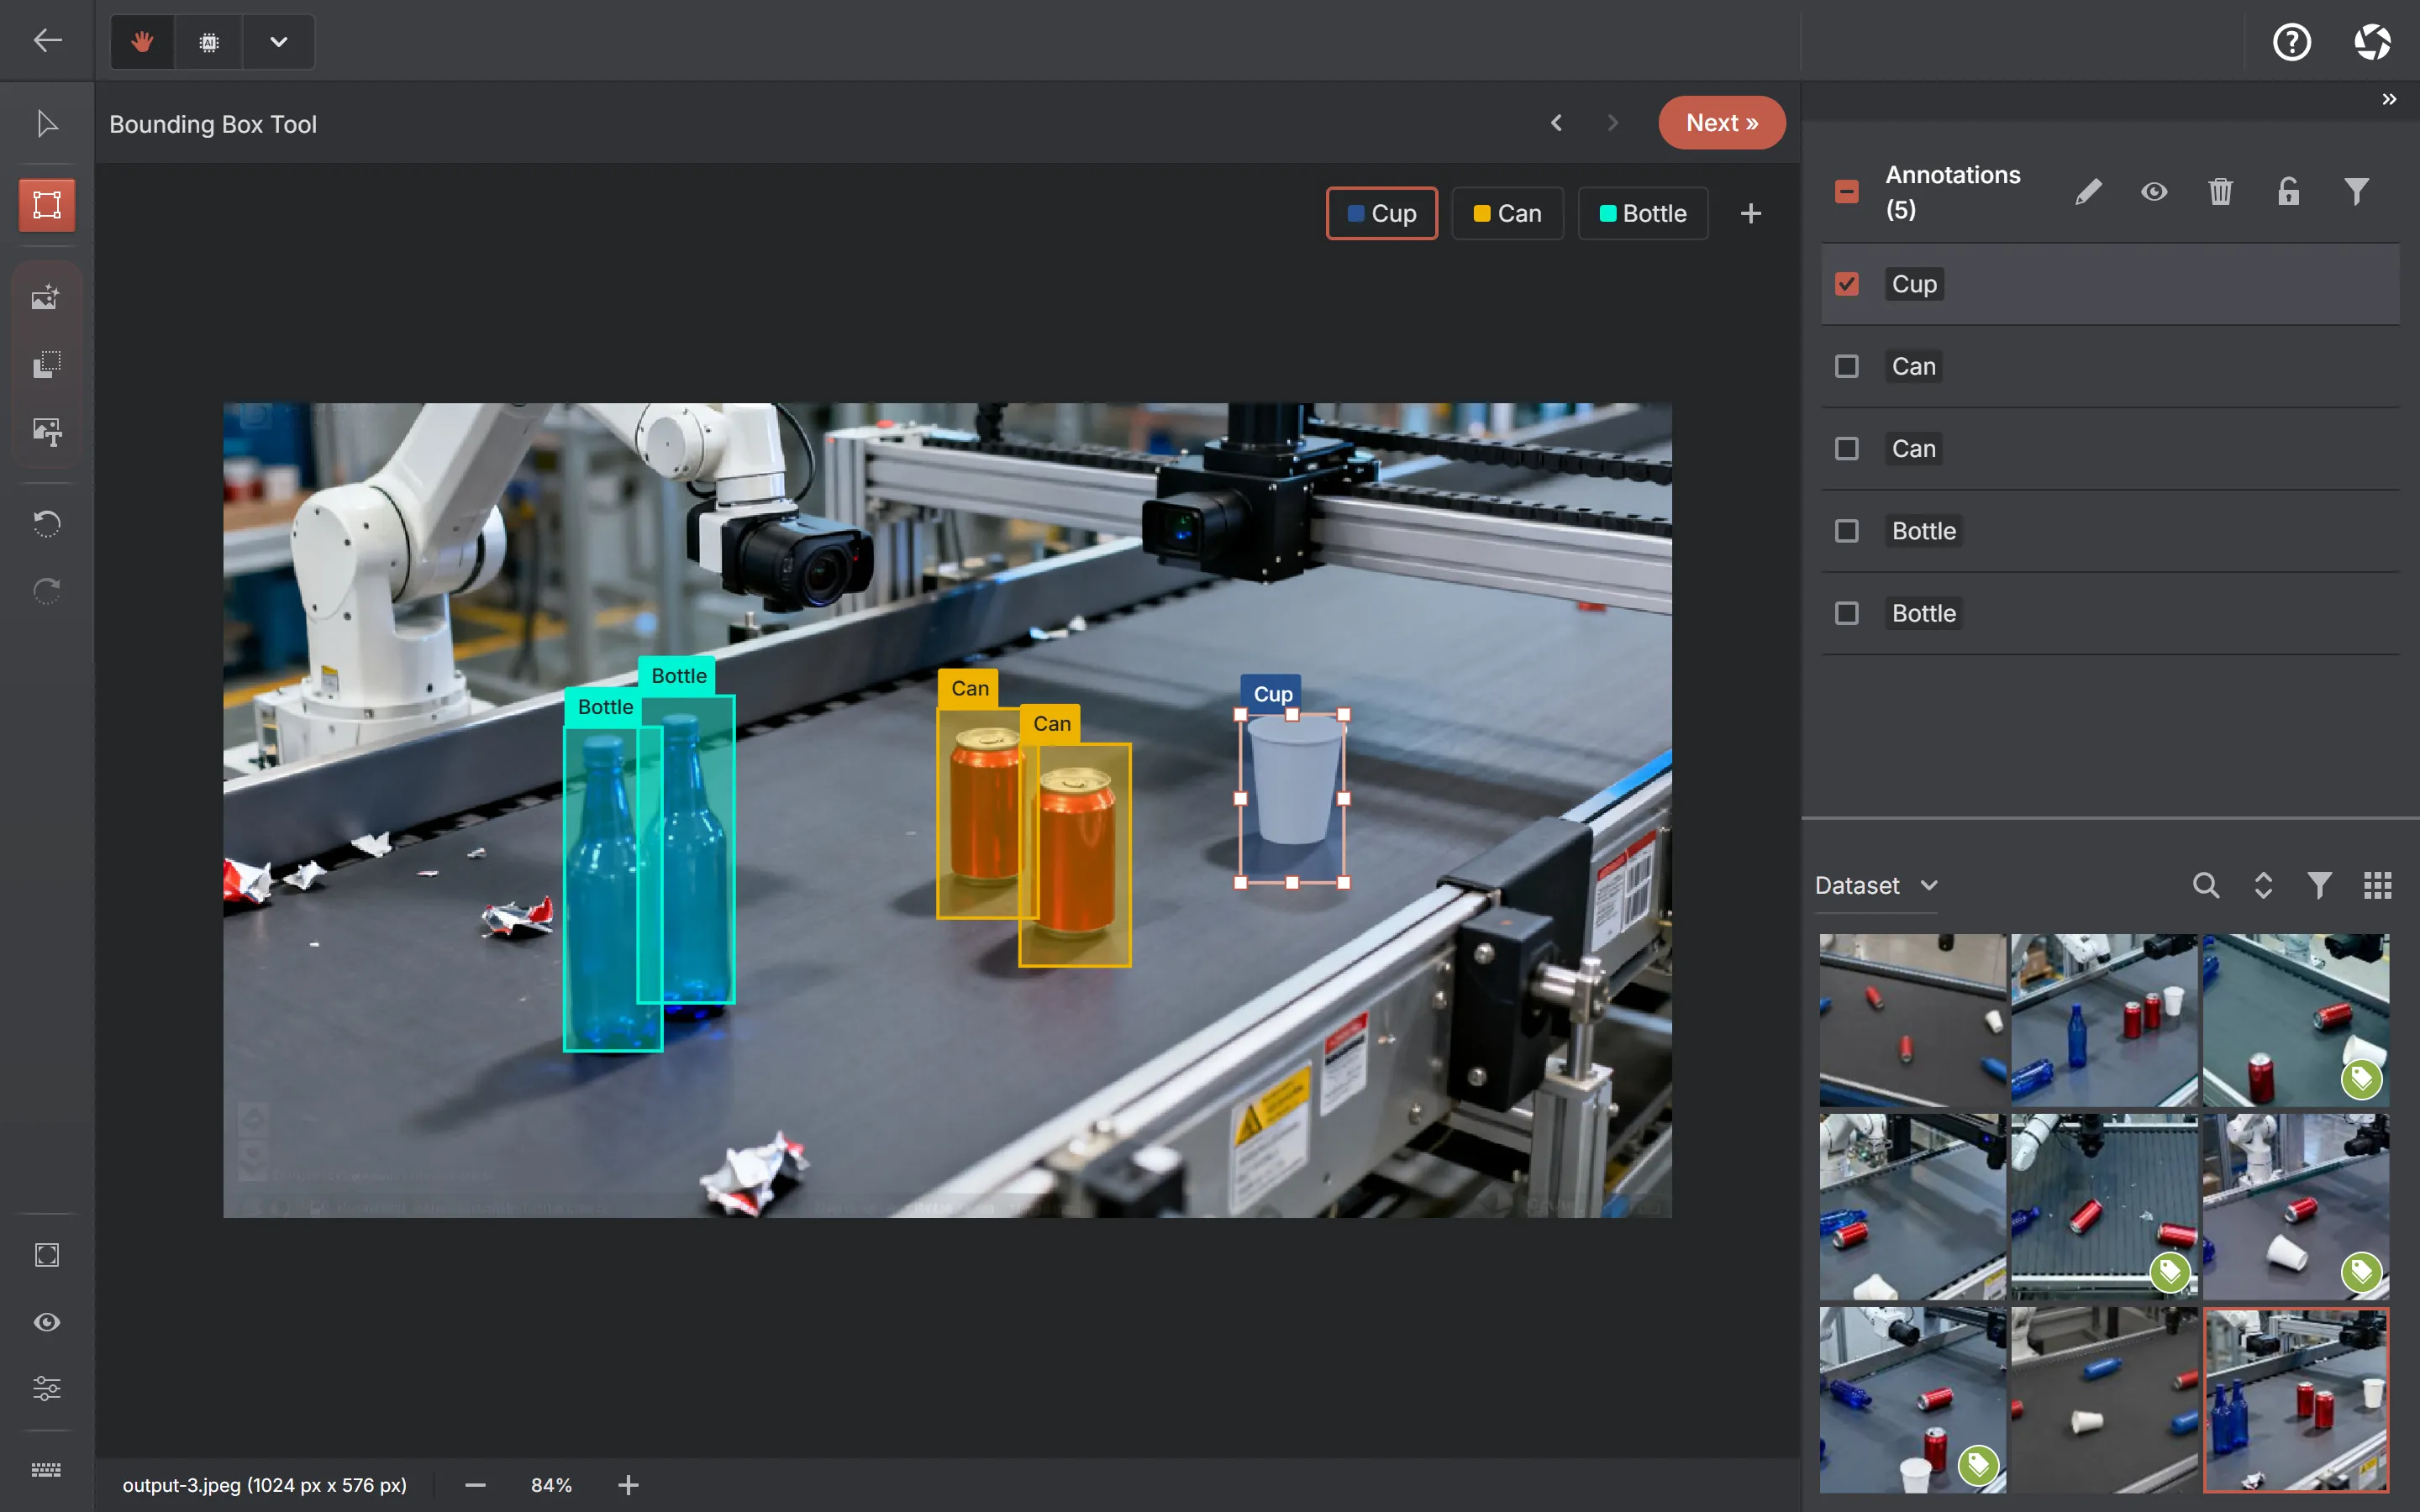
Choosing the type for your task
Work backwards from the question the model has to answer, not forwards from how precise you can be:
| If the model has to… | Annotate with |
|---|---|
| Sort images into categories | Classification — single-label, multi-label or hierarchical |
| Say where objects are, or count them | Bounding boxes |
| Measure area, or separate touching objects | Polygons or pixel masks |
| Locate parts within an object | Keypoints on a skeleton template |
| Follow one object through a clip | Video tracks with keyframes |
| Mark an activity or state over time | Whole-frame classification ranges |
The cheapest annotation that answers the question is the right one. A box takes a couple of seconds; an accurate mask takes considerably longer, and on a set of any size that difference is the whole project schedule. Starting narrow and re-annotating a subset later is easier than finishing a mask set you did not need.
One caveat worth knowing before you commit: assisted tools have changed this arithmetic. Segmentation models that turn one click into an editable mask make masks far cheaper than they were, which is why "boxes because masks are too slow" is worth re-testing rather than assumed.
The workflow, start to finish
- Decide the label schema first — the list of classes, and for each one what it does and does not include. Ambiguity here is the single most expensive thing to fix later, because fixing it invalidates work already done.
- Import the media. Images, or video that you either annotate in place or split into frames.
- Annotate — by hand, or with model assistance that proposes shapes for you to accept, correct or reject.
- Review. Someone other than the annotator checks a sample; for a small set, all of it. Reviewing nothing is a decision too, and usually the wrong one.
- Split into train, validation and test before training rather than after, and keep the split with the dataset so two runs stay comparable.
- Export in the format your training stack reads, and keep the archive: it is the version of the dataset that produced a given model.
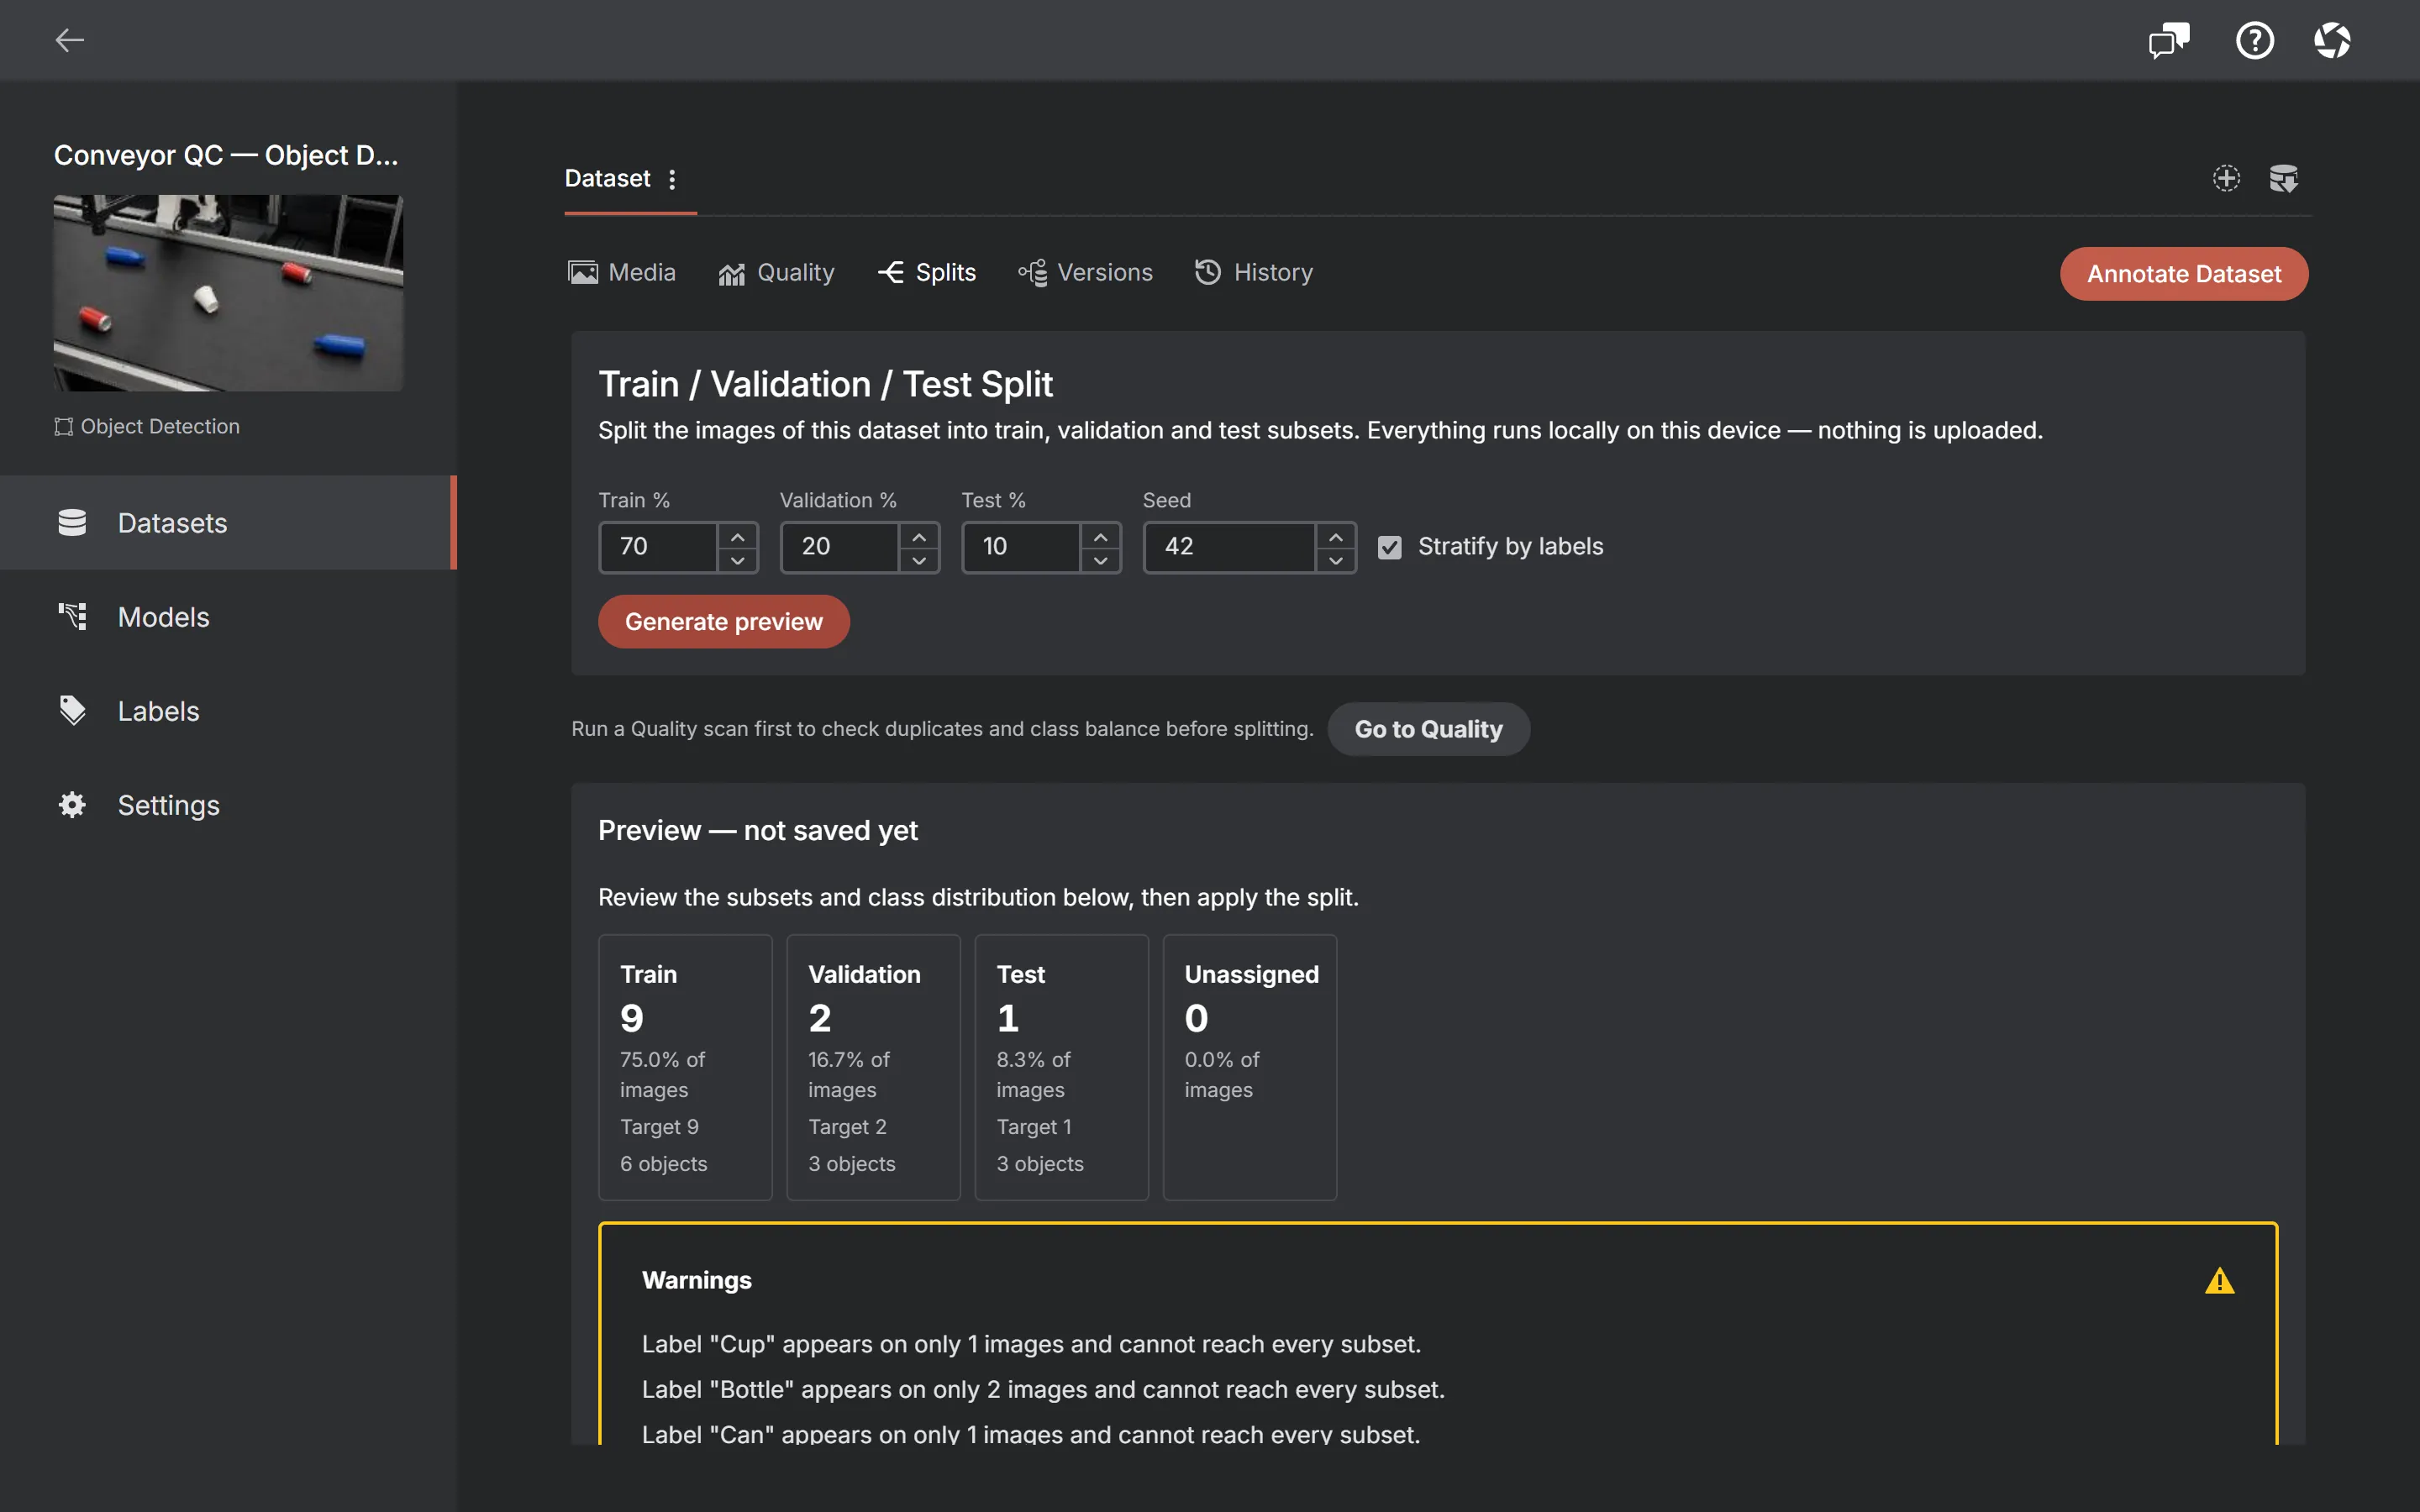
Dataset formats
A dataset is only useful if the thing that trains on it can read it. Four formats cover most image work:
| Format | Usually read by | Carries |
|---|---|---|
| COCO | Most detection and instance-segmentation stacks | Boxes, polygons, run-length-encoded masks and keypoints, in one JSON file for the whole set |
| YOLO | The YOLO family of detectors and segmenters | One .txt of normalised rows per image, plus a class list |
| Pascal VOC | Older detection pipelines | One XML per image — bounding boxes only |
| Datumaro | Interchange, and anything the others cannot express | Every shape type, plus attributes, label hierarchy and colours |
Conversion loses more than people expect, and it loses it silently. A pixel mask exported to YOLO is traced into polygon rows, which drops holes and thin bridges. A rotated box exported to COCO becomes the axis-aligned box around it. Neither is a bug — the target format has no field for what went missing — but it does mean one format has to be your source of truth. For most computer-vision pipelines that is COCO — the richest of the mainstream formats, and the one everything else can be produced from; reach for Datumaro only when your data holds something COCO cannot express.
Where annotation quality goes wrong
Most datasets fail for the same handful of reasons, and all of them are findable before training rather than after:
- Inconsistent class boundaries — two people disagreeing about whether a half-visible object counts. Written rules with example images fix this; adding annotators does not.
- Loose boxes. A box padded with background teaches the model that background is part of the object.
- Missing objects. An unlabelled object is not neutral: in detection it reads as a negative example, so the model is actively taught to ignore that thing.
- Duplicate images split across train and test, which makes evaluation report a score the model has not earned.
- Class imbalance severe enough that the rare classes are never learned — and are also the classes you probably care about.
- Degenerate shapes left behind by a mis-click: zero-width boxes, self-intersecting polygons, points outside the image.
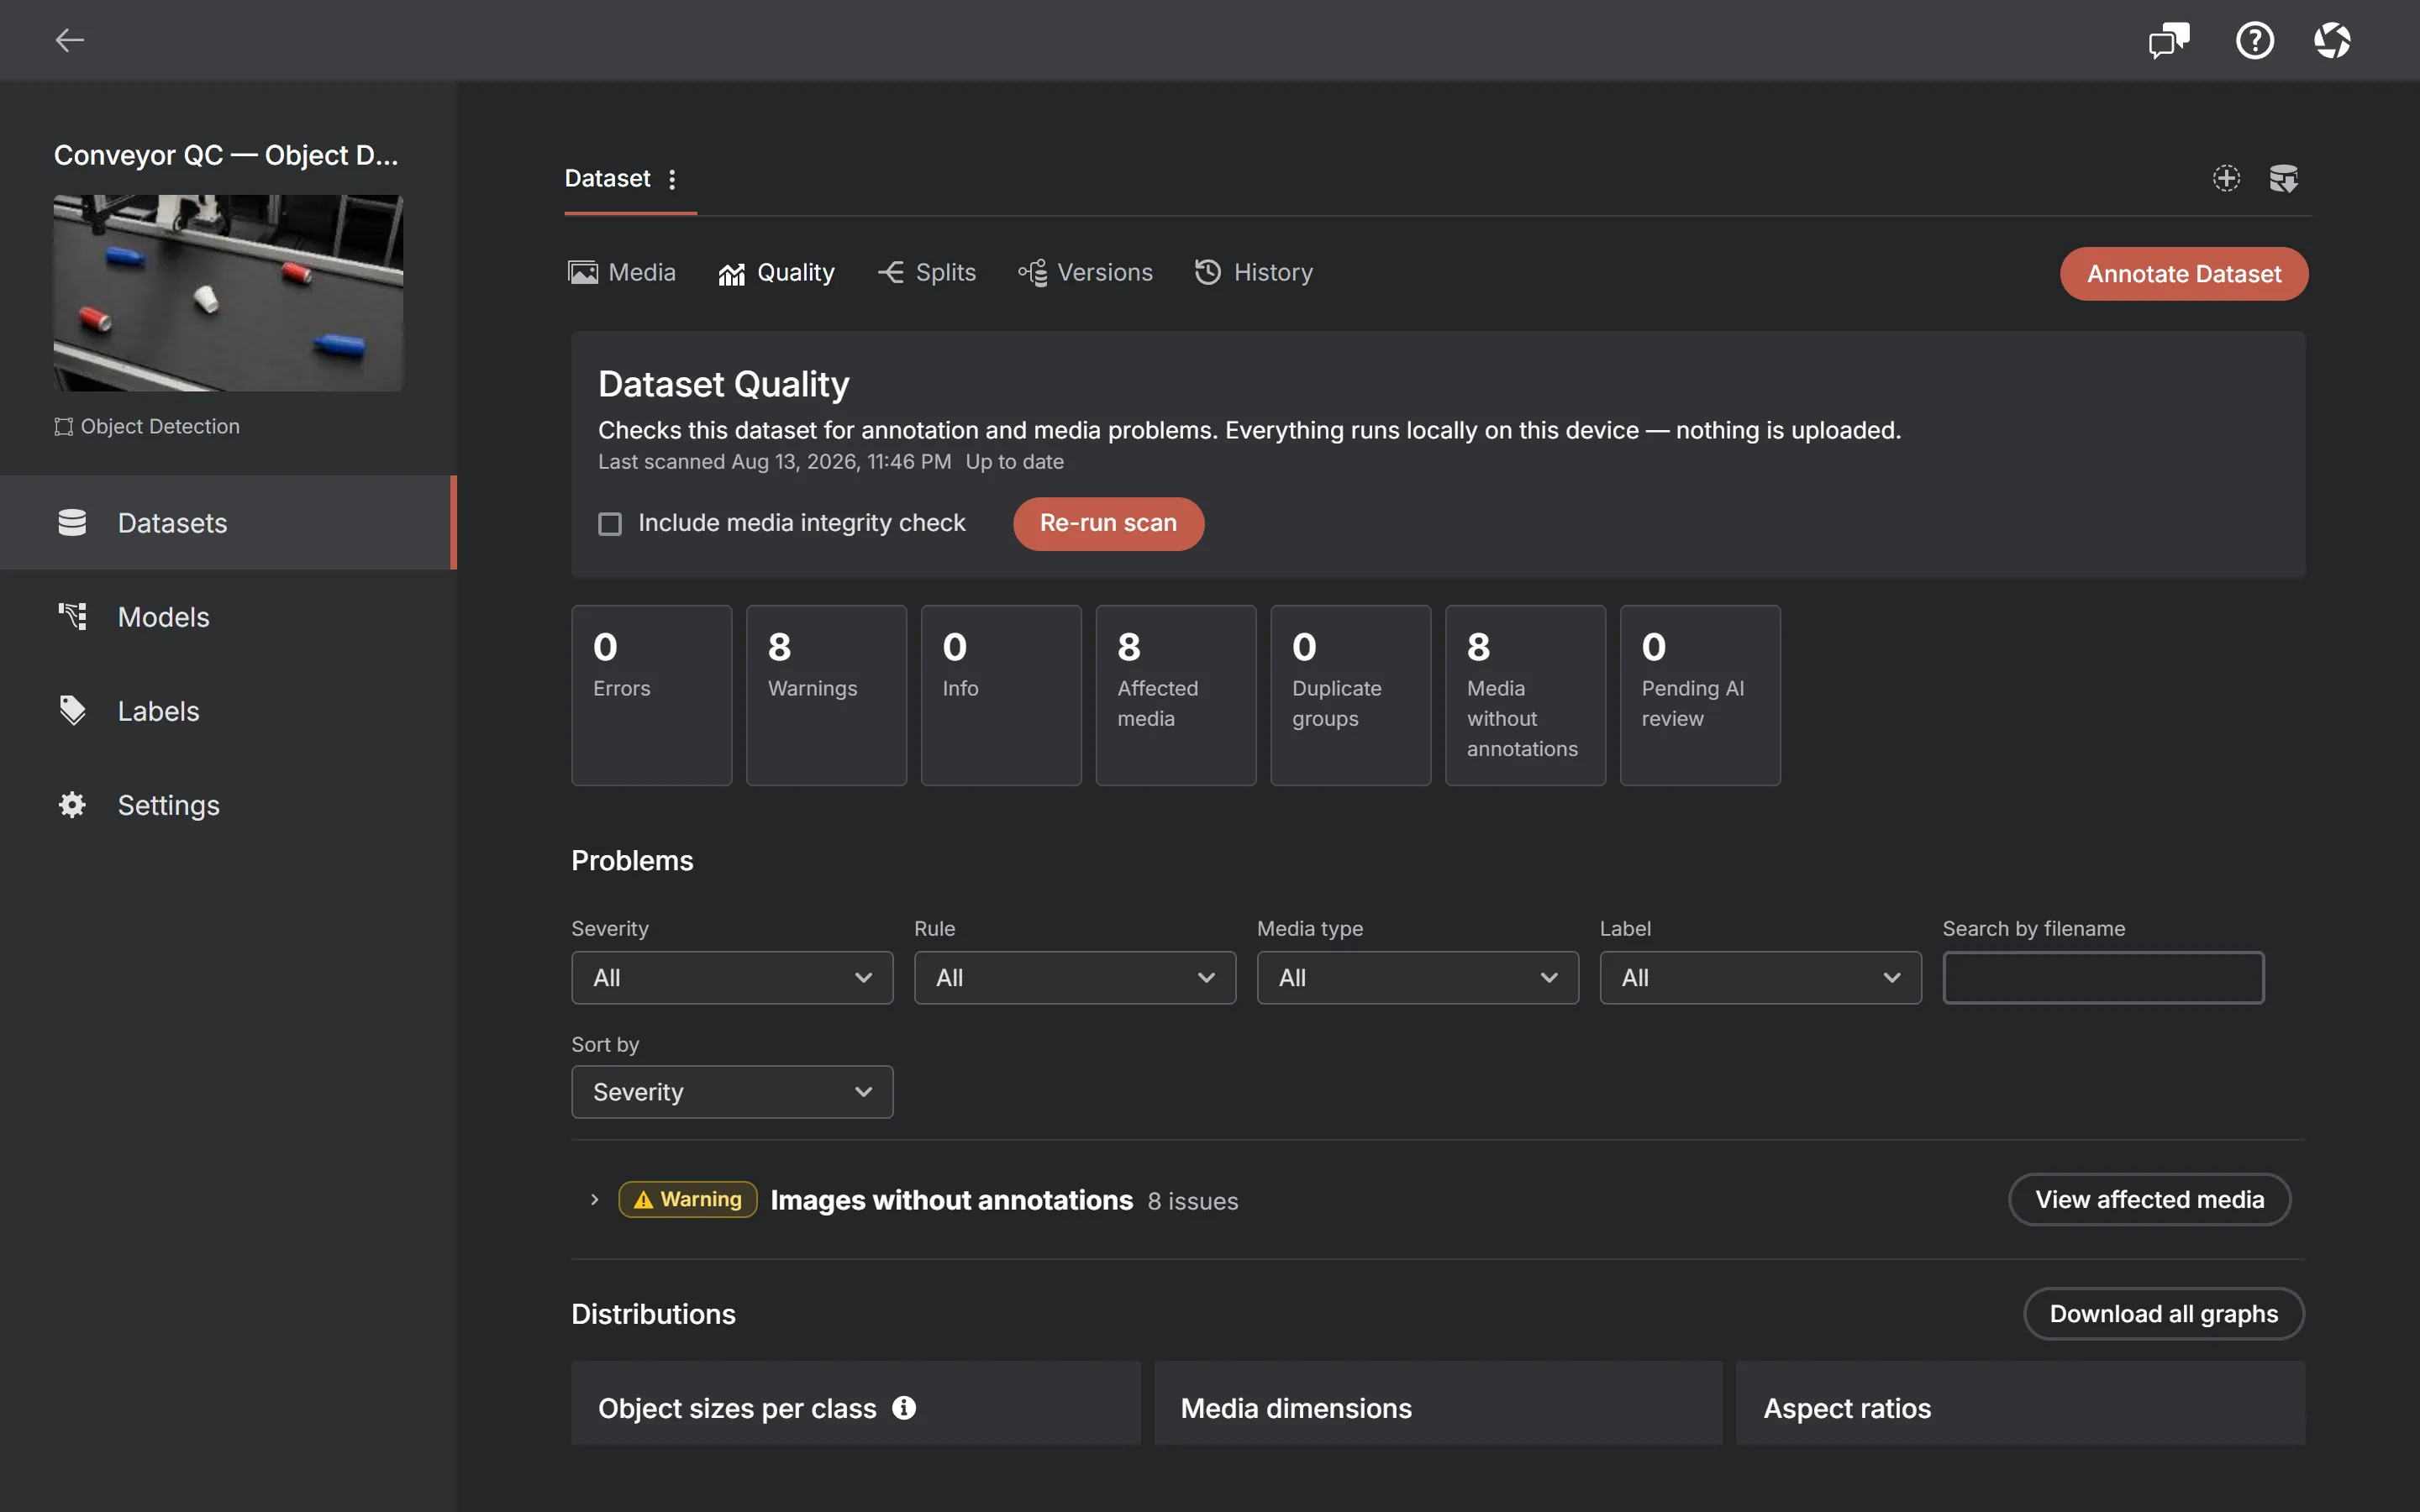
This is worth automating because none of it is visible while you are annotating. AnnotateIt runs the scan on demand over a dataset and reports what it finds; it never repairs anything on its own, and it tells you when the dataset has changed since the last scan so a stale report cannot be mistaken for a clean one.
Video is a different problem
Annotating video frame by frame scales badly — a one-minute clip at 30 fps is 1,800 images — and it produces a dataset that has no idea the frames are related. Tracks solve both: you annotate an object on a few keyframes, the positions in between are interpolated, and the object keeps one identity across the clip, so car #1 stays car #1.
The alternative is to extract frames and treat them as independent images, which is the right move when you are training a plain image model and only need variety. Both are legitimate; the deciding question is whether the model needs to know that two frames show the same object.
Does annotation have to happen in the cloud?
No, and it is worth being clear about why it usually does. The images are already on your machine, the drawing happens in your machine’s graphics stack, and the assisting models are a few hundred megabytes that a current laptop runs locally. Hosted platforms exist for team workflow, managed annotation labour and shared storage — real problems, but not computational ones. Nothing about the annotation itself requires a server.
That distinction starts to matter the moment the images are medical, legal, industrial, or simply not yours to upload. AnnotateIt is built on the other side of it: the app, the AI tools and your data all stay on your device, in the browser or in a native build, with no account and no upload step. What that does and does not mean is set out on the privacy page rather than summarised in one line here.